Imagine you have a room with no more space to put shelves. It would be really intimidating for you as there is no more chance for you to do it.
Hence, it looks really important to utilize any side of your home. One of the most efficient ways is by building a DIY corner shelf.
Not only help you to save more space, this also really helpful for those who only own very small area to build shelves. So let’s get to know more.
It’s not really surprising that utilizing corner spaces doesn’t seem totally easy. As much as you know, there will be no more possibilities for you to put anything in there.
Further, it also limits you when it comes to redesigning or redecorating this area. But it doesn’t look that difficult as well as you know there are many ideas to apply with using both less money and less effort. All this way is called “do-it yourself”.
What is DIY Corner Shelf?
First of all, what makes everything goes well is by understanding what actually corner shelf is. In simpler way, you can mean corner shelf as something necessary as you need to maximize your storage space.
But things you only have is a very small area. People may don’t know that they get so many possibilities and have a lot of things to do whit the corner, and one of the thing is decorating corner shelf.
Not only bringing something difference into the corner of your room, by building corner shelf you’ll be able to add function into your home.
But things come across to anyone’s mind is the question how to do it very well. Thus, as much as you may do it by only yourself, things need to be prepared is about materials and perfect step by step instructions.
Let’s get to know more how easy it will be as you did it by yourself.
Benefits of Applying DIY Corner Shelf
Coming to shop and choose what design do you like seems really easy, but does it worth it with budget you do have? So it’s time to find another simple way.
Building DIY corner shelf would be truly giving you many advantages, so instead of spending more money in furniture offered in extremely high price, why wouldn’t you try to take little efforts to make your own corner shelf that only made by yourself?
1. It helps you to display your personality
As much as you have many options and chances to put your own idea in making corner shelf, it could drive you to display your personality. It’s time to put any items you wanted most which can reflecting your personality.
Deciding which things to be chosen as complement also helps you to represent interests and hobbies. Some collectibles you have collected before can be easily displayed as you make it by yourself.
On the other hand, nowadays people get many chances to choose which designs they’re going to carry through.
No need to feel overwhelmed as you enter the shop with plenty designs displayed in there. Just choose a very simple way with building it with only put your efforts.
When corner shelves have been ready to use, you may need some ornaments put on there. Here you can choose what thing fits to shelves you have just made whether it depends on colors, tones, themes, or even shapes.
2. By creating corner shelf on your own, it adds function into it
Many designs and models of shelves offered by market don’t always match to your needs. It’s because market just provide what mostly people like and sell only items that mostly customers buy.
Meanwhile, there may be some reasons you reject the model due to its function or just the design you don’t like before. So, it would be necessary to bring out your own style including function into your own shelf model.
Just don’t limit yourself as it would be a main key. As much as you don’t know, shelves put at the height can be something very excellent.
Not only for bookshelf or to put some ordinary items, as much as you put creativity while making it, corner shelves will likely give you any unpredictable functions.
Let’s say there will be very useful to put drinks on the DIY corner shelf’s surface or just put your lovely living houseplants above it.
3. You can built what it’s called “hidden storage”
Corner shelf made by yourself will also give you “hidden storage”. It’s actually really easy to do. A sturdy shelf would be something you need as it will be standing up as it’s distracted with any movements.
Meanwhile, a basket or box can also be put at the bottom-most shelf as it functions to keeps kid’s toy neat. Sometimes you can also change functions depends on items you have and dimension that fits to its size.
4. It helps you to optimize space
You may all have heard that creating corner shelf will help you enhancing room space. Technically a floor-to-ceiling model of shelf will give benefits as it’s applied on the small room.
Sometimes people will experience lack of space while it comes to decorating room. A built-in bookcase that created in floating shelf model can be another option you can dedicate then.
As well as you shelve this thing up, all items or stuffs that look totally important and essential can be located at the cornered-hanging shelf.
By bringing all things into corner hanging shelf, you will have more space as it enhances and frees up the items, stuffs, or ornaments you may put on the entire room.
5. You will get extra spaces
As well as you transfer all things into corner shelves you have just made, you will automatically have free space on your closet. Here you can many possibilities to reorganize or rearrange the entire wardrobe.
Moving shelves into the corner and bring it up into hanging model also provide you more space over your room. There you can turn it as the extra place for hangings or folded clothes by applying single bar.
However, before you bring all items to shelves, just make sure it would fit and match with the size of the shelf. Begin with categorizing stuffs and items like clothes, pants, and anything else.
After bringing all those things into their own category, you just need to put it as much as it’s allowed. However, you can also bring unique touch by locating bars, baskets, or any other items between the corner shelves.
6. Creating corner shelf also help you to organize clutter
Build new shelves with applying corner shelf idea will allow you to reorganize which stuffs are still usable or should be brought to the trash. You will be able to have a good visual sense as you separate all those items.
Further, as much as shelf can hold various items, it will give you way to display essential things that are very easy to access. Put shelves into the corner looks as great as de-cluttering things.
It needs to remember that you may take more time while integrating all items you have, so just do it in more reasonable way. Make sure any items you will either keep it stay there have essential functions.
Instead, any items you ought to bring them into the trash have no other function anymore. But before de-clutter things, just bring all items in same group depends on heights, shapes, colors, or even functions.
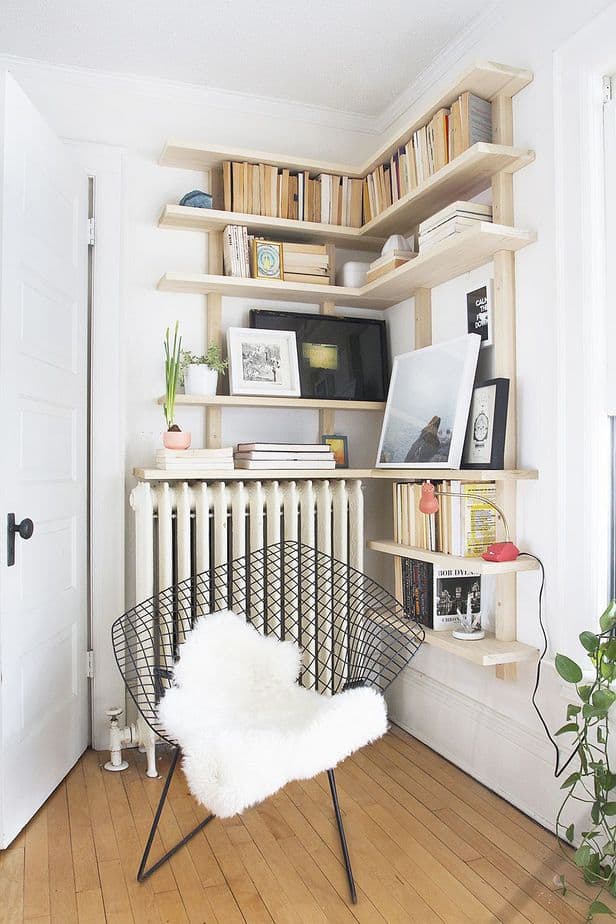
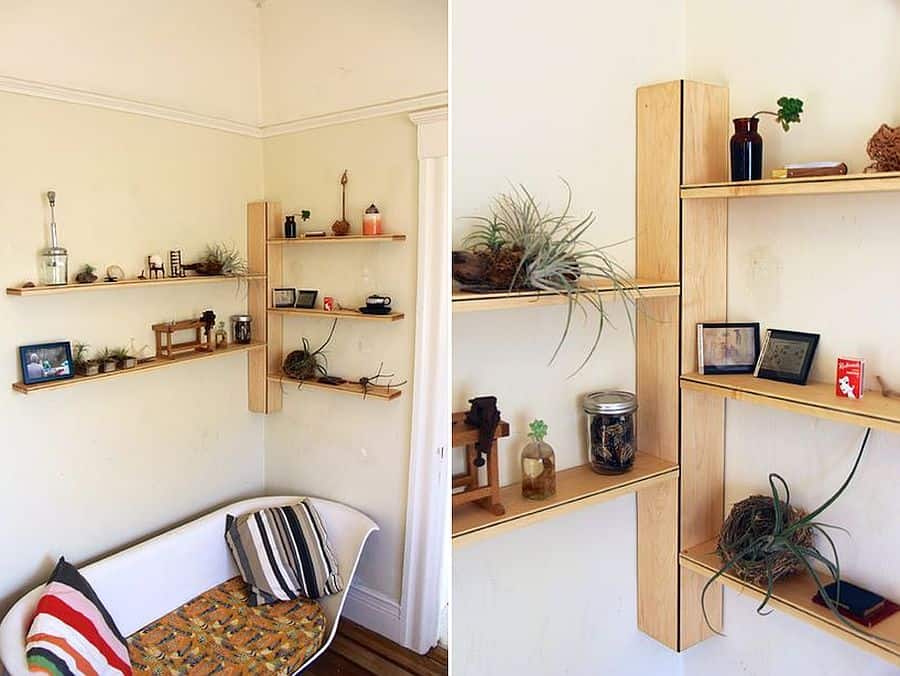
DIY Corner Shelf Flying Design
Creating DIY corner shelf in flying design seems really chic and neat. Not only provide you very good sight over your room, it’s also absolutely easy to create.
We bring you the first design that you may take as reference while trying to redecorate your room with this idea. Overall, all materials used are taken from blocks of wood.
All materials are totally trustworthy as it looks solid and thick compared to others.
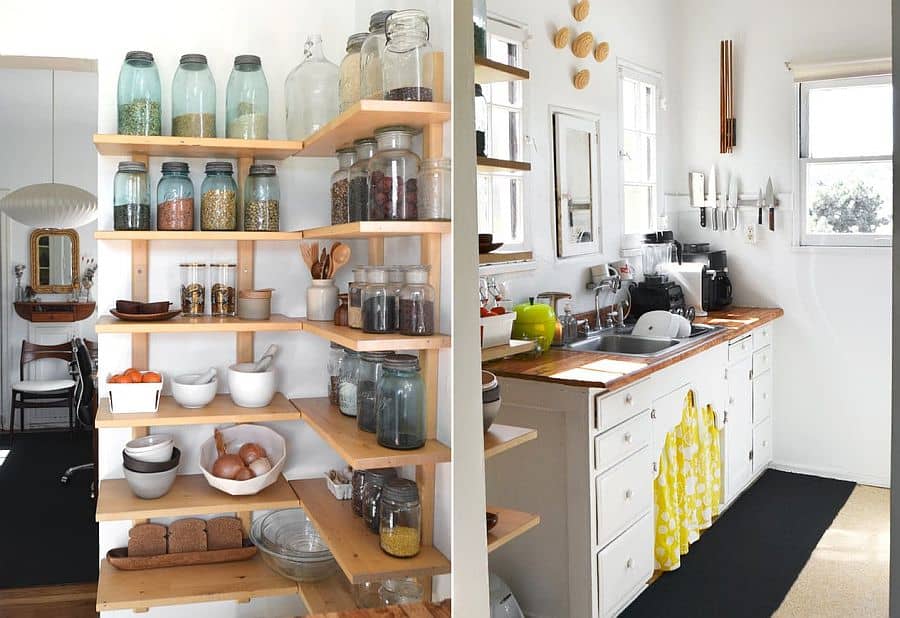
1. Supplies Have to be Prepared on making DIY Corner Shelf
Shelving may enlighten you in way of redecorating room. Not only helps you to create spacious look over the room, it also automatically organizes any items and stuffs which should be de-cluttered immediately.
It’s a great yet useful trick that everyone needs to bring it real. Down below are step-by-step instructions of making shelving you can follow very easily.
Anyway, this model will look like floating shelves, so it would be really interesting if you pay an attention.
- six 2 x 4s
- 1 1/4″ wood screws (recommended to use)
- spackle
- caulk
- heavy duty fasteners (recommended to use)
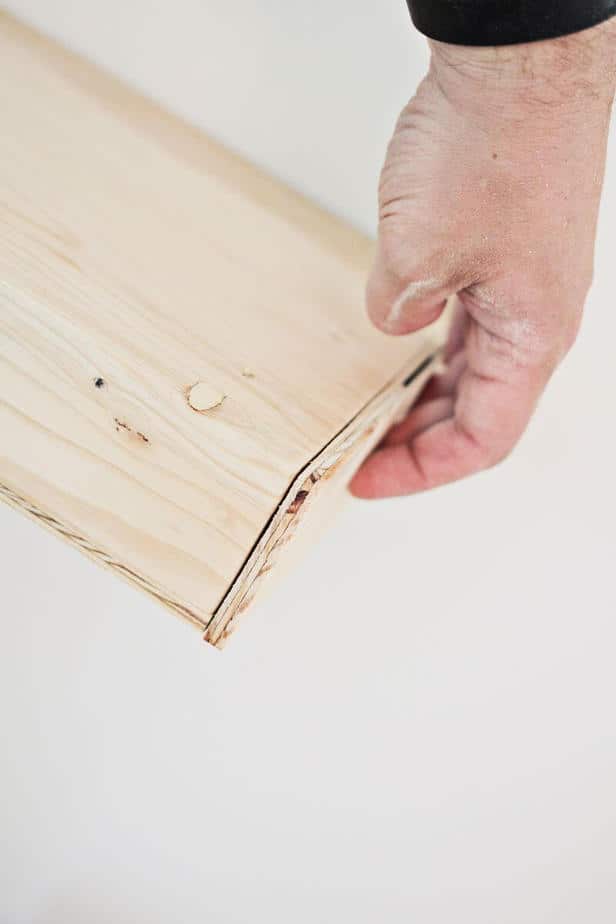
- one 1/4″ x 4′ x 8′ plywood
- two 1 x 8 x 12 kiln-dried cedar (as well as you buy lumbers, ensure you have checked wrapping too)
- wood glues
- paints
2. Steps to Build DIY Corner Shelf in “Flying-look” Design
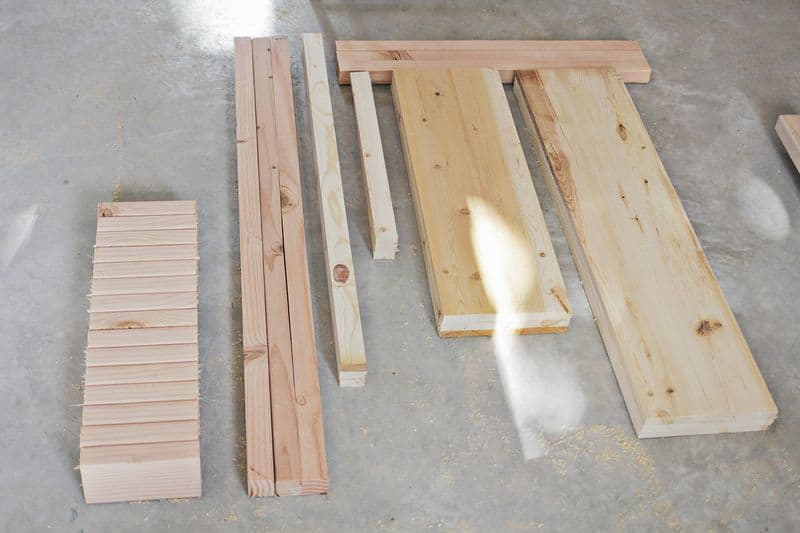
- On the first step, you have to cut all woods you have bought. To save your time, you can do it by collecting all woods then cut all those woods at once.
Ensure every size and the way you cut are correct. Do not let anything run in wrong measurement. If you feel that this step looks risky, try to do this process as smooth as you can.
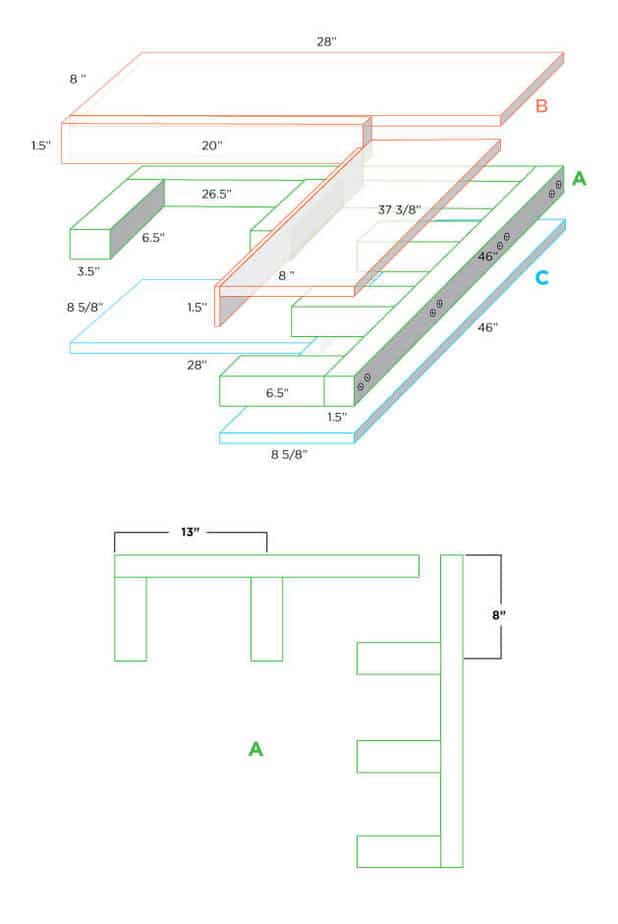
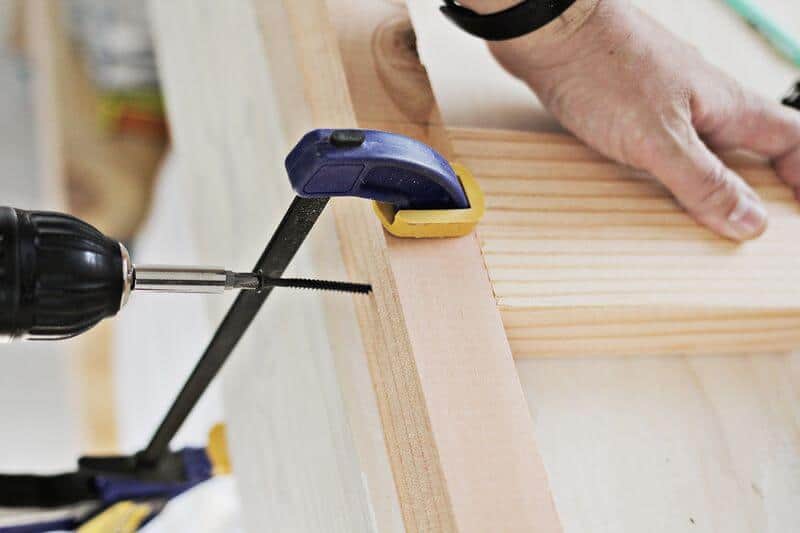
- After cutting all woods you have collected before, now it’s time to assemblage all parts. Just establish it based on figure A we have shown you at the diagram.
Before you’re going to screw the 6 1/2 x 3 1/2 pieces, we suggest you to crack down the 1 ½” piece firstly. However, to keep everything durable, it’s better to give two screws in any piece you do.
-
abeautifulmess.com
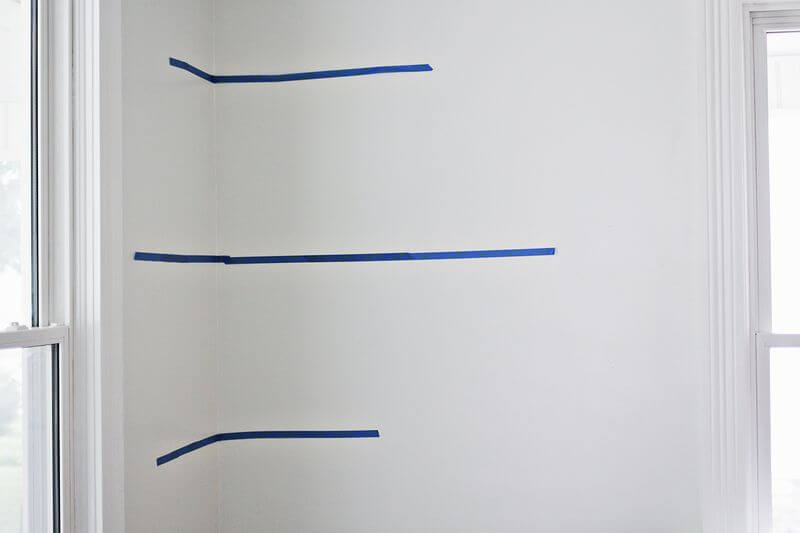
- The next step will likely little bit funny as you will find a tricky hack on this process. Now you may be reading as you picked out all of the space, so you need to visualize the space.
The simplest way to do it is by utilizing what mostly people called “painter’s tape”. This kind of item would be really helpful it will assist you in visualize spacing. Just look at this following picture below as your references.
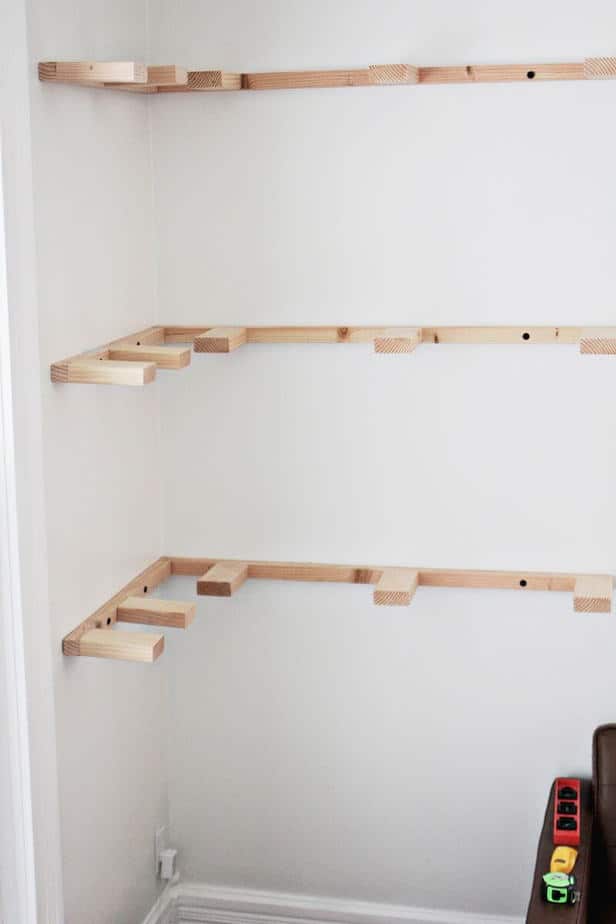
- As well as you’re following the entire process of creating DIY corner shelf, now you have everything ready with studs found, all set up set, and materials at hand. So it’s time to bring all shelves down.
Putting shelves would be really easy as you have applied painter’s tape at the previous step. To simplify this step, we suggest you to do it first from the bottom to the top with an A pieces.
As well as you want to a sturdy object, ensure you’re perfectly handing the studs. After you have done with an A pieces, continue with the B pieces as it will be done with the same process.
- We know that you have very sturdy square wall, so do not be worry with nailing process.
On this step you have to consider underside and end pieces as next object to screw and nail. This next instruction you can easily see on this following picture down below.
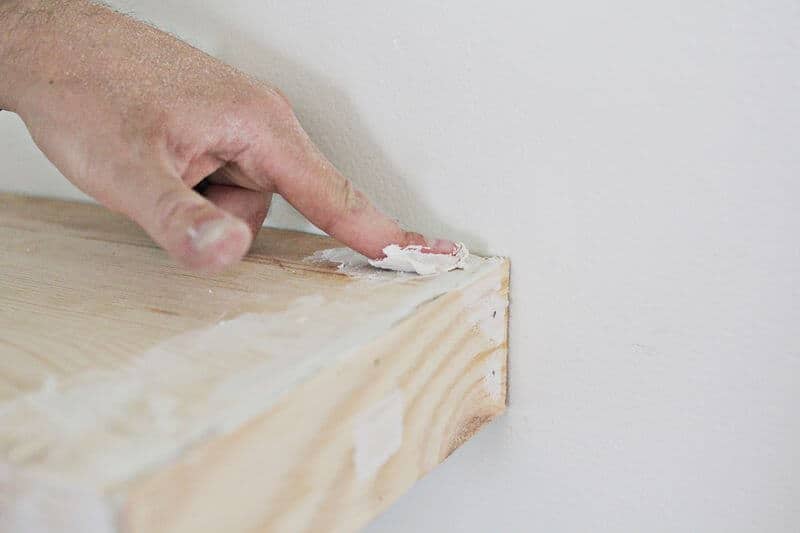
- Seems like we have reached step five with all process almost really done. At this step, you have to run either putting nail or screwing holes.
For a better results, we advise you to make caulk around the shelves done first. As you have done with this part, you will find no more spaces showing anymore around this object.
Continue the step with the process of detailing. Detailing process can be really essential as it can help thing you make will look more stunning.
- You have come so far for this entire process. Now it’s time to put color into this object. Just try to tap the wall as well as you’re interested to play with any other colors.
- Once you have done the painting step, means it’s time to dry the paint. If you’re doing this process along the day, just put shelves outside. Just let it dries under the yellow bright sun.

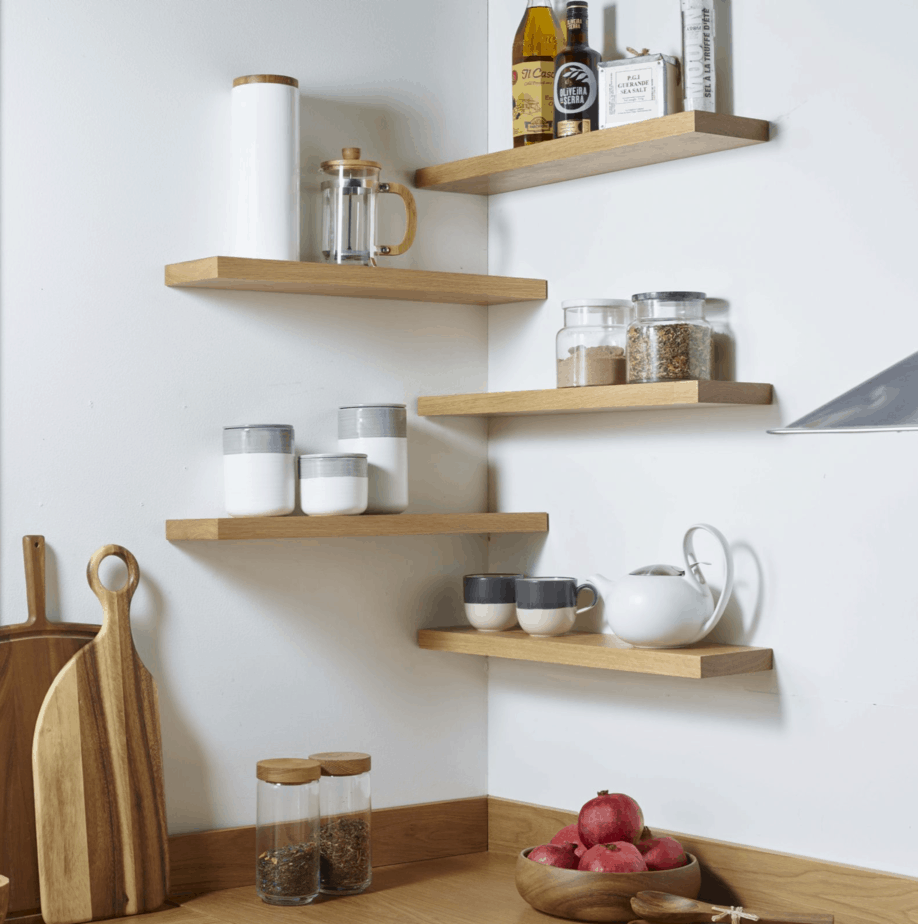
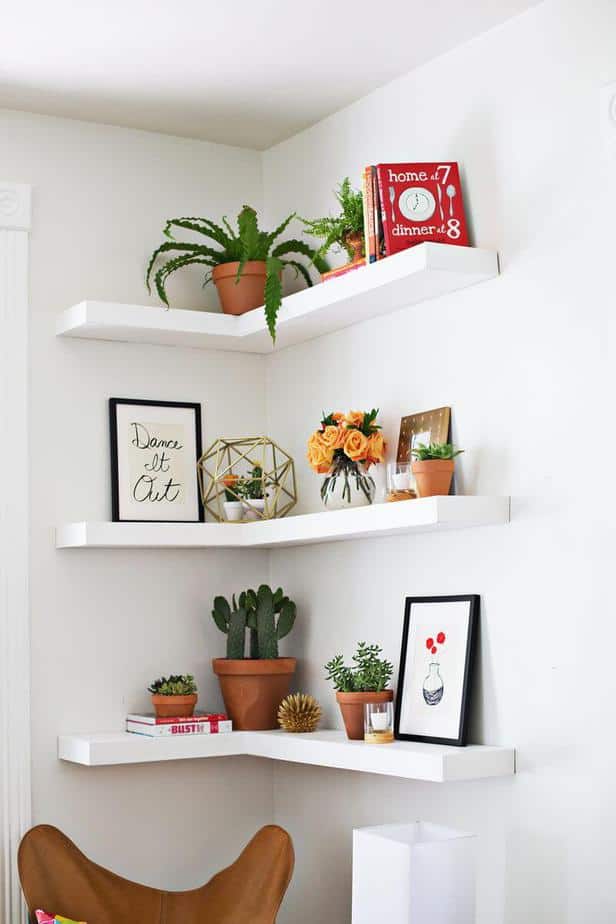
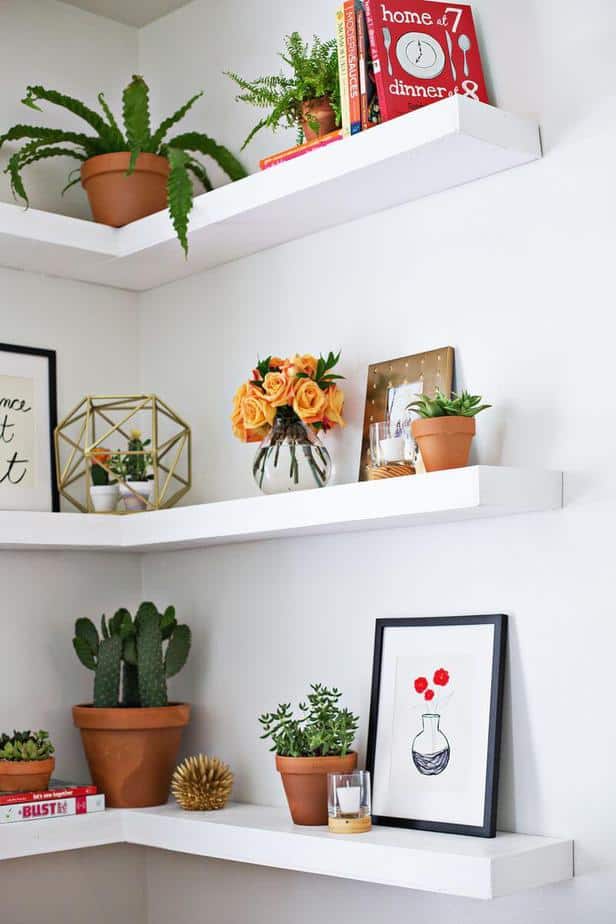
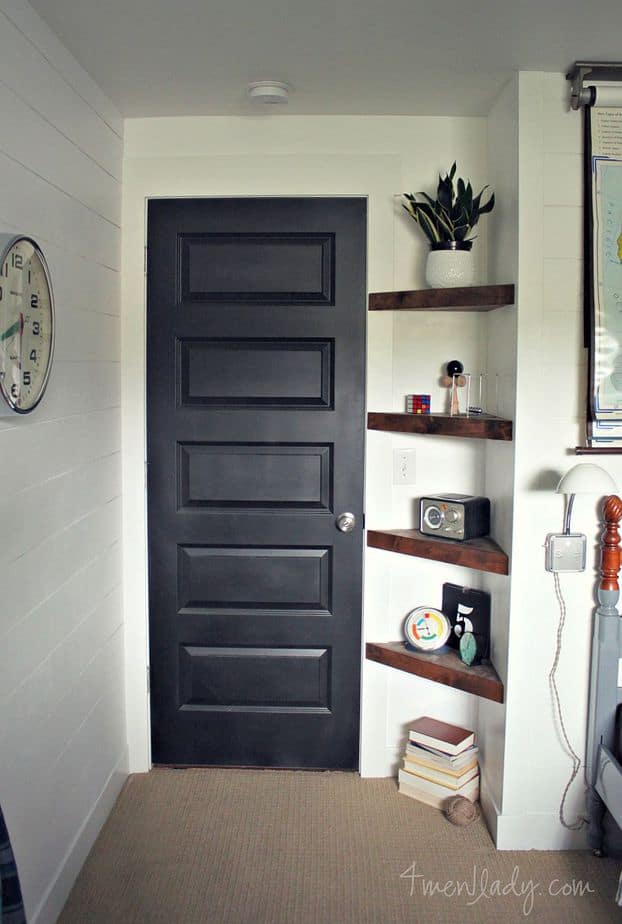
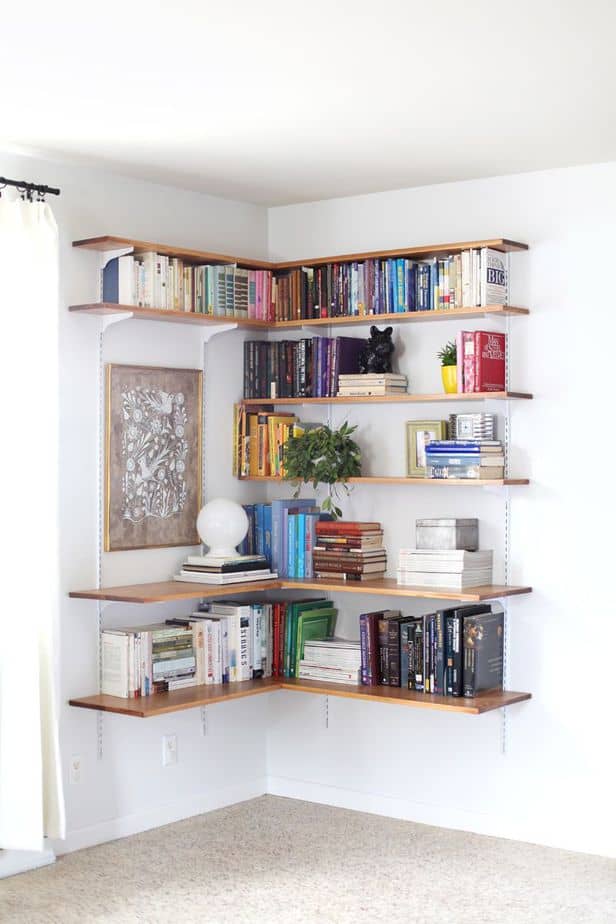
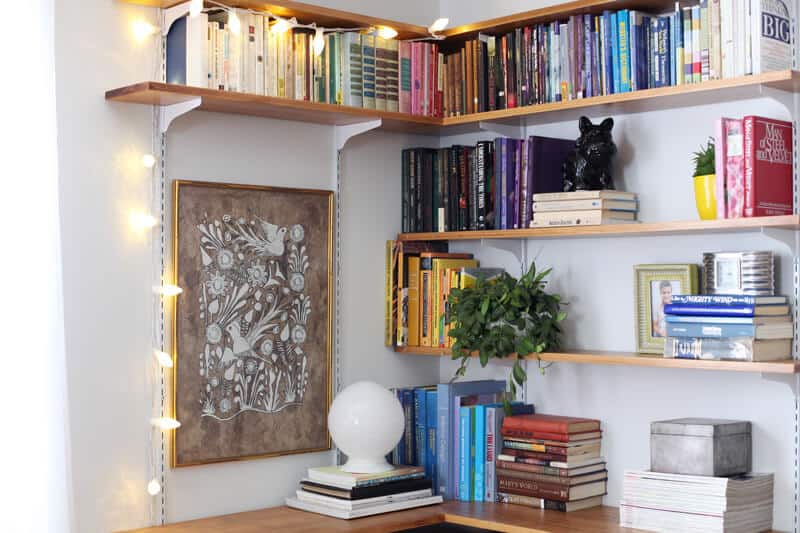
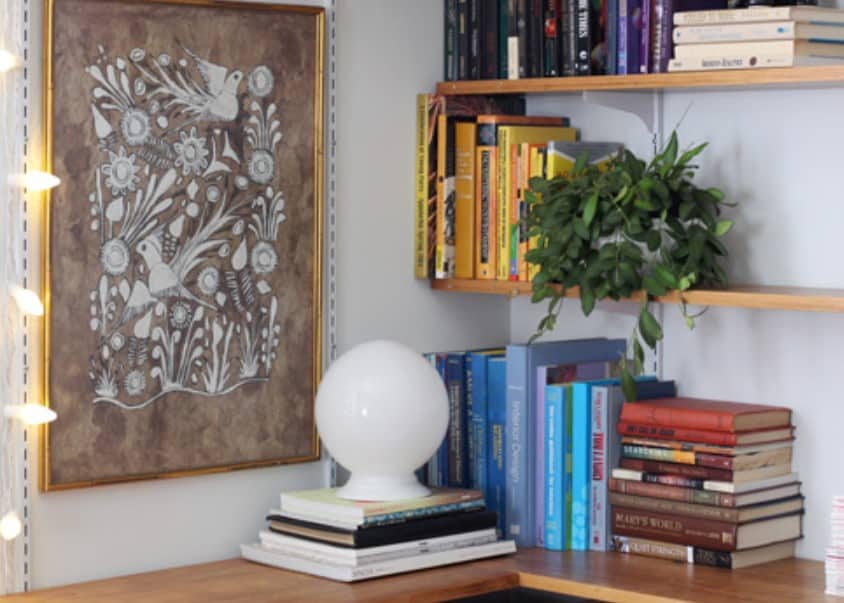
- Completing the painting process means you’re completing all process of creating DIY corner shelf. As you have a brand new corner shelves, it’s time to put any interesting items just right there. It’s cool to put photos, living houseplants, and any other things that fit to be put on the shelves.
- Do not forget that you have also a chic bookend, so you can make one side of the shelves as a book-shelf. Now you have done the DIY corner shelf process and now you have brand new shelves which are totally ready to go.
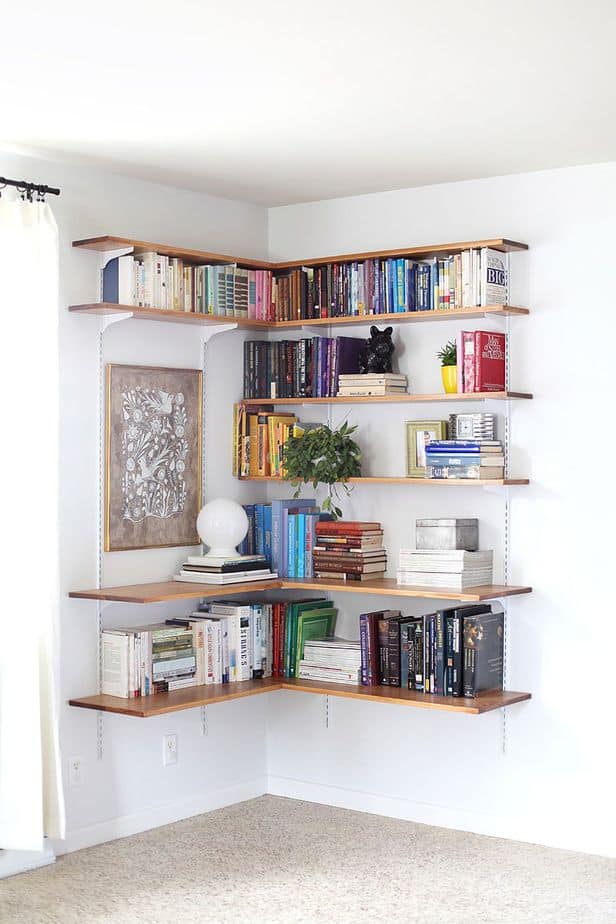
Follow This Simple DIY Corner Shelf Instruction to Save Your Money
You may already know that owning corner shelf can be really useful yet helpful. With lot of functions, design, and organization it provides, you can create it actually with really low budget.
Being savvy in budget while creating DIY corner shelf means there is a key in this process. So we’ll tell you with any facts about DIY corner shelf and how to go for it in savvy budget.
The key to create shelves in totally low budget is about understanding its function and knowing the location it will be put. As much as you know with the answer of those two questions, it will be all save in process, budget, and function.
However, just pay your attention into this following process of making DIY corner shelf in savvier way. Make sure you don’t have anything missed in every step it takes.
1. Plan anything you’re going to cut
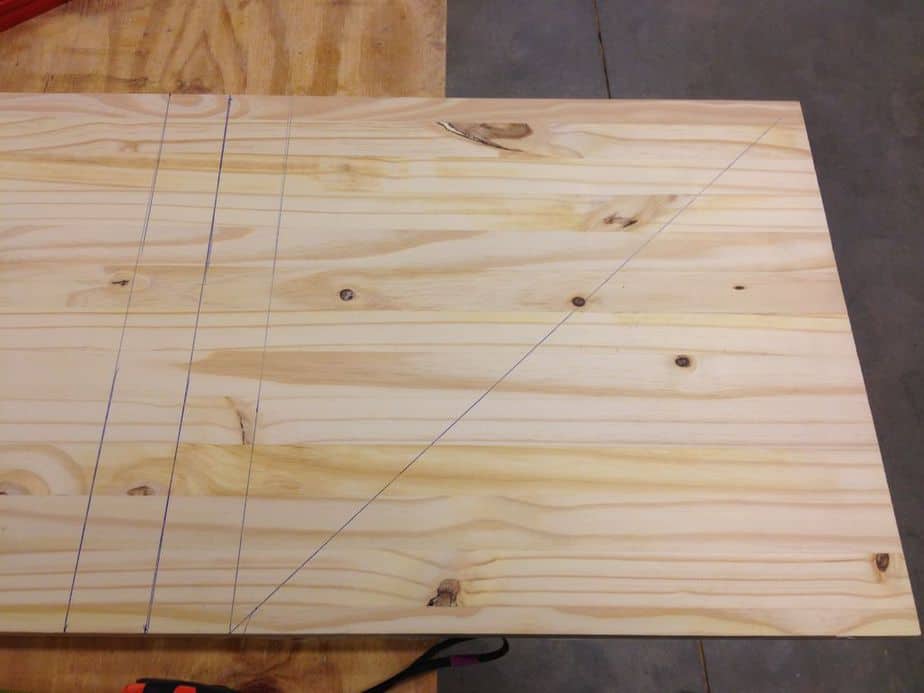
At the first step, you have to be entirely ready with any items that should be cut as main materials.
Cutting materials should be done very perfectly and correctly, so in order to avoid mistakes or problems, you can begin the process with making cut plan on the board.
As possibly as the saw will break wood in this cutting process and bringing difference dimension of the wood, you need to do it very carefully.
Make plan of anything you’re going to cut would be recommended. Just begin the process with having the first cut by drafting the wood. If it’s possible, you’re able to do it by using pencils.
2. Let’s consider the table saw
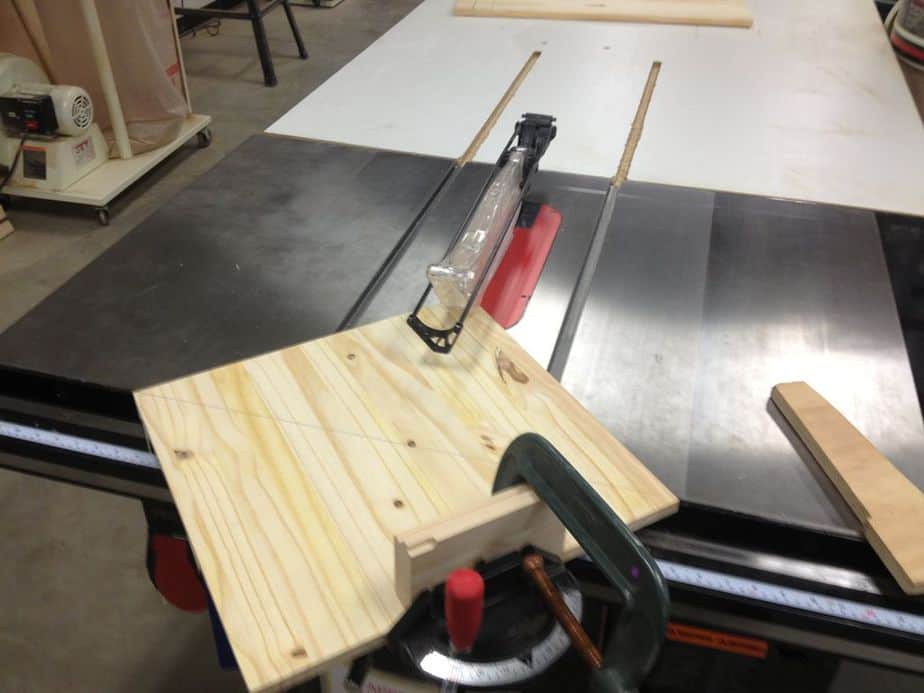
On the next process, you need to square any materials up then cut things down the center. You’re making the first cut is to obtaining board that shaped in short size, so this process would be really important.
To ease your way in this process, you’re recommended to use Miter tool or Table saw.
3. Time to prepare the base
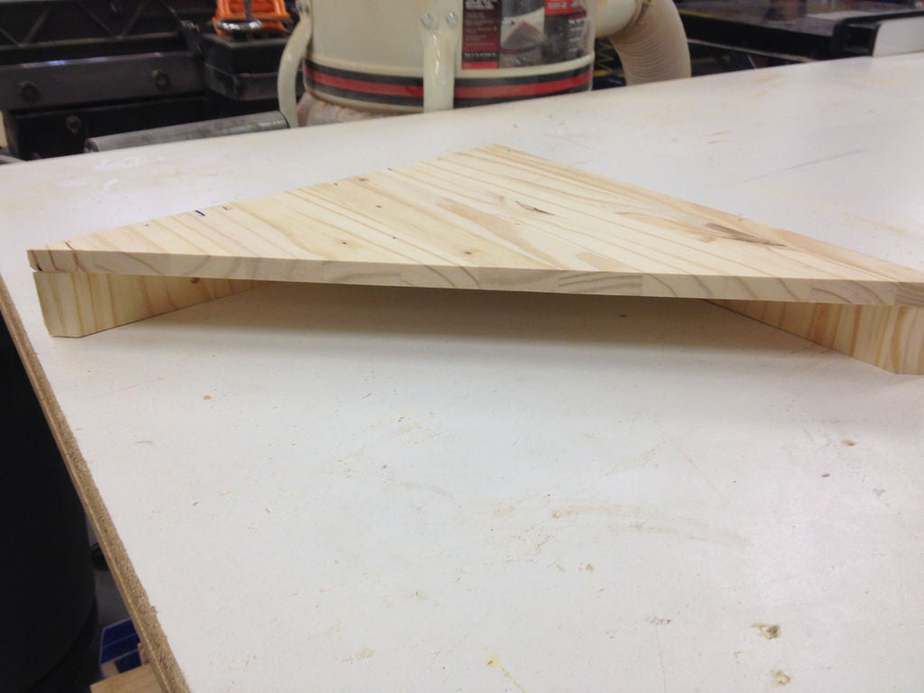
After preparing all shaped materials, now let’s move to the base preparation for creating the DIY corner shelf process. Make sure you have two triangular pieces of materials in hand.
It’s because the first piece would be needed in process of making floating shelf. Meanwhile the second piece would be used to make original board.
In the process of making original board by cutting two 2”, we recommend you to use the table saw. All these things will be formed as a mounting base afterwards.
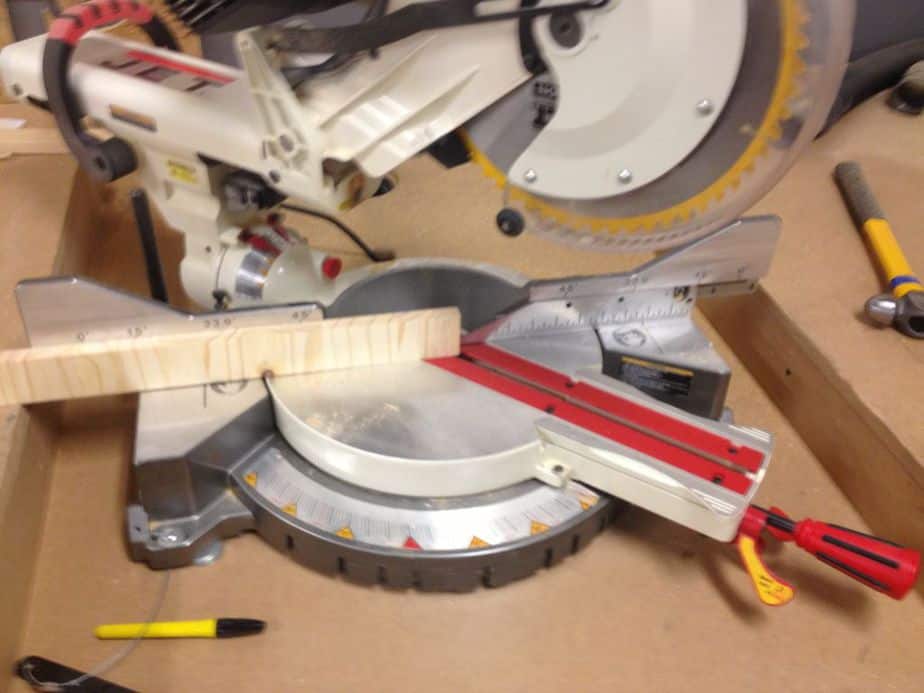
4. Take a look into base pieces, time to process cutting tips

Let’s continue the process with cutting tips of the base pieces. Here you have to measure the size at a 45 degree angle. It’s really important because it will help to clean up additional board length by matching the top board.
5. Preparing the wall mounting
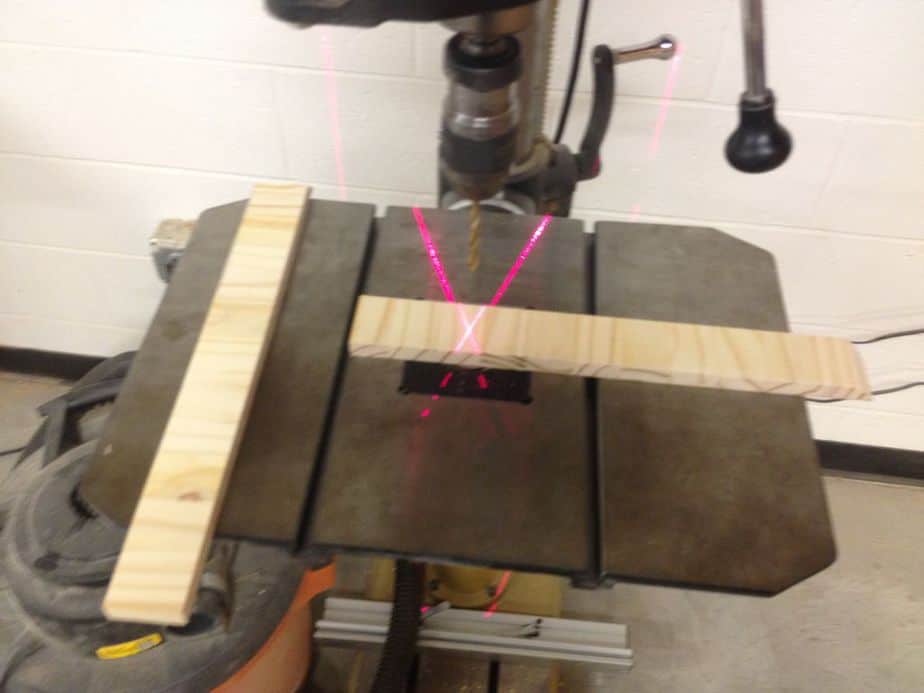
To prepare the wall mounting you are going to use later, now you should prepare the drill press to screw holes in some ¼”.
6. Bring all boards together
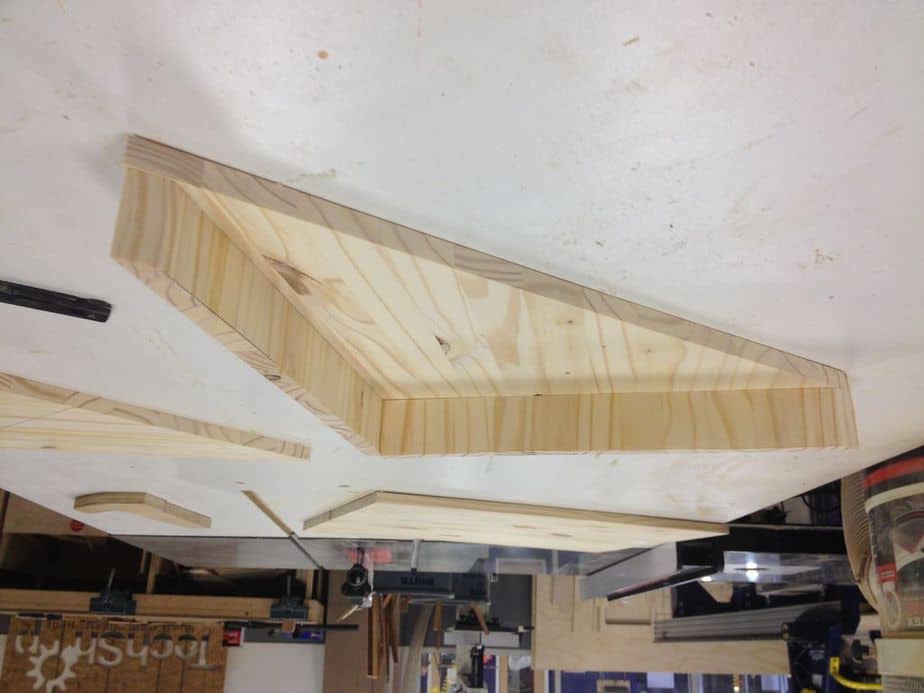
After completing previous step, now it’s time to bring board back and match it up together. But before that, you have to find rough edges then sand it immediately.
On the other hand, you should also cut it all until it’s separated from any other necessary segments. However, make sure you have a board that suitably fits one another.
7. End up the process with finishing nails
Now you’re almost done. At this process, you have already an assembled board. The last process would be involving nails as it’s used as connector.
As the board has the top and sides, here you need to finish the process by connecting the boards by with nailing it.
To make sure you have a very durable board and hold this project still, we recommend you to use clamps as much as it’s needed.
However, now you have done the entire process with the brand new board you can put on the corner of the room. As you run the DIY corner shelf process completely, it’s better to end the process by giving little touch into it.
If it’s needed, you’re able to sanding the top by put some wood stain over it as one of the further step.
Simple Tips You’d Better to Consider while Creating DIY Corner Shelf
Creating DIY corner shelf may be full of tricky things, so it’s good to know what things should be either done or avoided.
We share you some facts including tips about the things you would better to consider as well as you’re creating DIY corner shelf. Check all the tips down below.
1. Just play with either vertical or horizontal side of the corner
We know the result of DIY corner shelf doesn’t always look good, so in order to beautify your corner shelf that may look slightly standard, you can make shelf move up or down without giving drill and remains holes into the wall.
Sometimes people would consider vertical design as it’s really visually appealing for the room.
2. It’s essential to plan lumbers you’re going to purchase

Another important tip mostly people missed is about plan the amount of lumbers they need. To avoid problems in this process, you have to know these several things.
First, you have to understand the function of shelves you’re going to make. Will these be aimed to put books, items, or living plants? It would be necessary as the materials of board have also to be fitted with functions.
3. Simply easy to furnishing the shelves
After making DIY corner shelf, you may need some simple ultimate touch over it. As the simplest way to furnish it, we suggest you some essential tips you can follow.
First, arranging things based on the color and size will be really helpful to bring anything looks neat.
Second, as you have many items expected to put over the shelf, you need be more selective by de-cluttering things you want to display.
You may have a home with corner looks awkward yet left empty. Instead of bring anything that possibly decreases the quality of look, why don’t you put a corner shelf over it?
With following step-by-step instruction of making DIY corner shelf we explained above, it would be help you to make corner shelf in easier yet savvier way.