Does your TV stand looks worn out and unattractive? If it does, you need to consider replacing it with the new one. There are choices of TV stand ideas that will make your family room looks more interesting.
However, some of them may not fit the style and size of your interior. Therefore, it is a good idea for you to consider creating DIY TV stand on your own.
This DIY project is fun. In addition, it allows you to have a TV stand that fits your interior perfectly. Moreover, creating your own TV stand can help you save the budget.
Some of you may think that this kind of project is difficult to do. However, it is not always so. Some of the DIY TV stand ideas we have are quite simple to make.
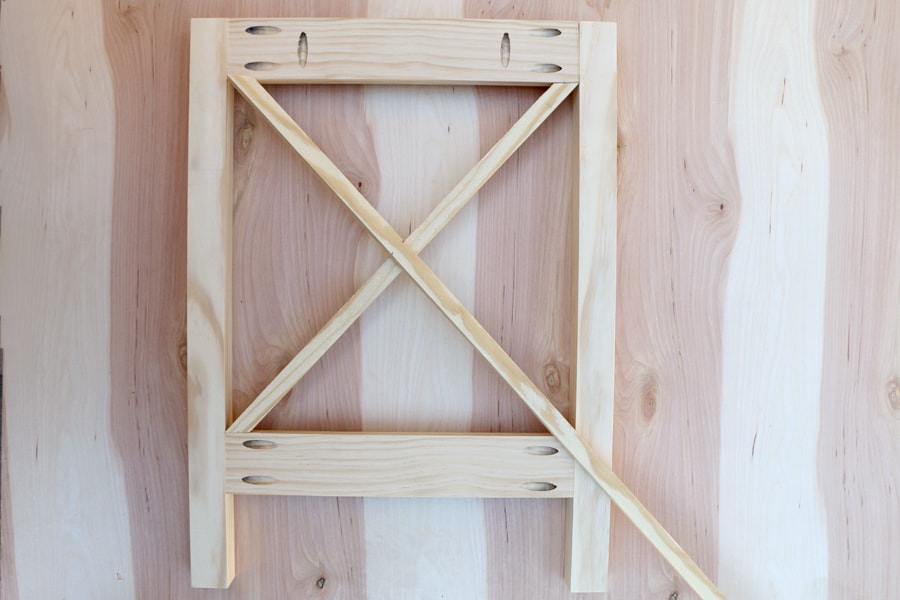
X-Leg DIY TV Stand
If you are looking for some easy DIY project for your TV stand, you must try making this X-Leg TV stand. This TV stand idea is simple and elegant.
Therefore, it will look great in most interior styles. If you want to have this furniture, you need:
- 36” 2×2 board: 1
- 1/2” thick plywood: 1
- ½” thick 96” pine bead: 1
- 96” 1×3 board: 2
- 1 ¼” kreg screws: 24
- 1” kreg screws: 12
- Finish
After you prepare the materials, you can follow these steps to create this X-leg TV Stand.
- Cut the wood products into:
- 4 cuts of 1”x3”x23” for the legs.
- 1 cut of ½”x45”x18” for the console top.
- 4 cuts of 1”x3”x14” for the leg connectors.
- 3 cuts of 1”x3”x41” for the leg connectors.
- 1 cut of ½”x41”x14” for the bottom shelf.
- Assemble two console legs and two 14” long leg connectors so that they form a frame like leg. Do the same to the remaining legs and 14” long leg connectors.
- Glue the X ornament on each leg.
- Connect the two legs with two 41” long leg connectors on the upper side of the frame.
- Screw the console top into the upper side of the leg.
- Use the remaining 41” long leg connectors to connect the lower side of the legs
- Screw the bottom shelf into the lower part of the legs.
- Finish the TV stand with stain or pain and seal it polyutherane.
- Once the finish on the console is dry, you can replace the old TV stand with it.
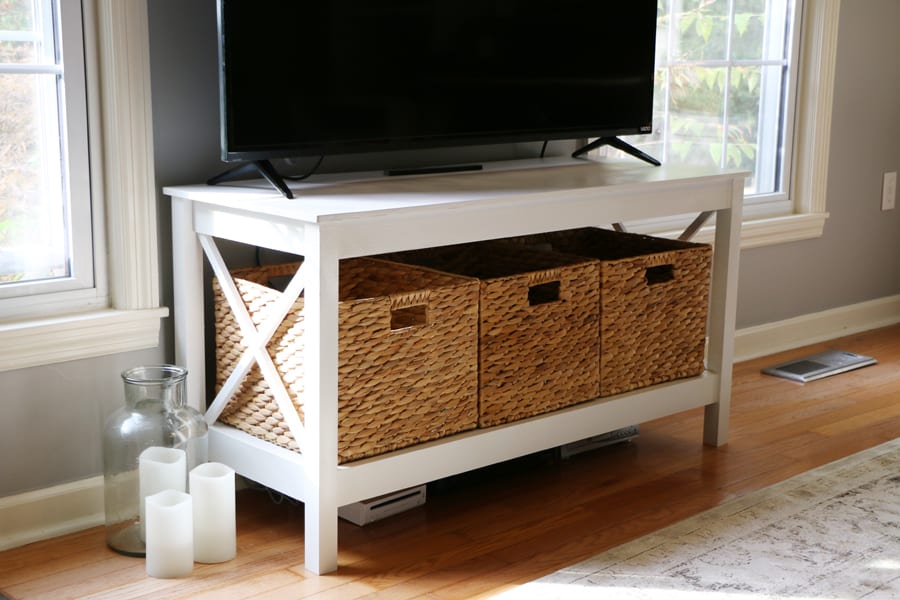
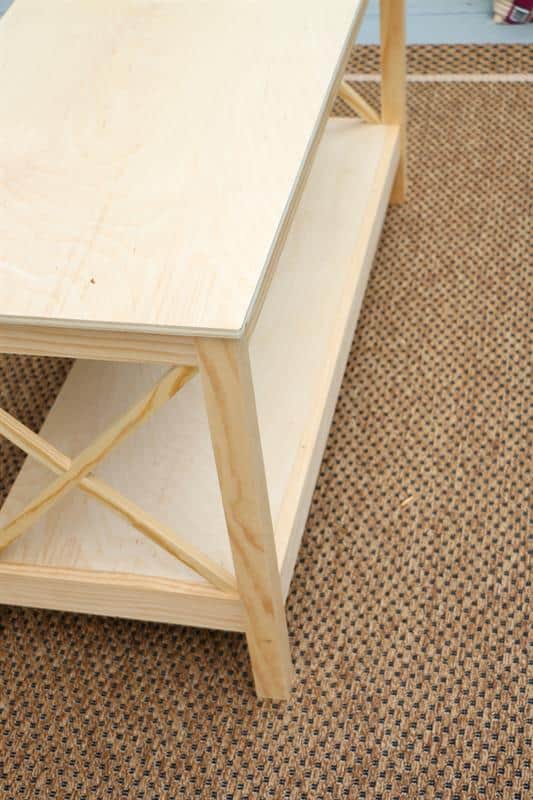
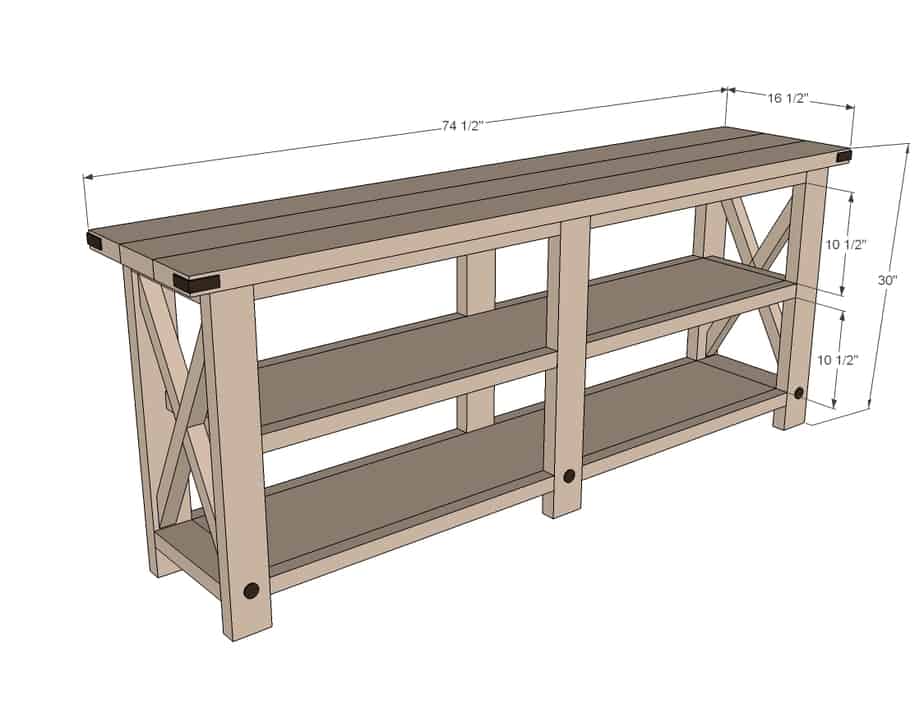
Farmhouse DIY TV Stand
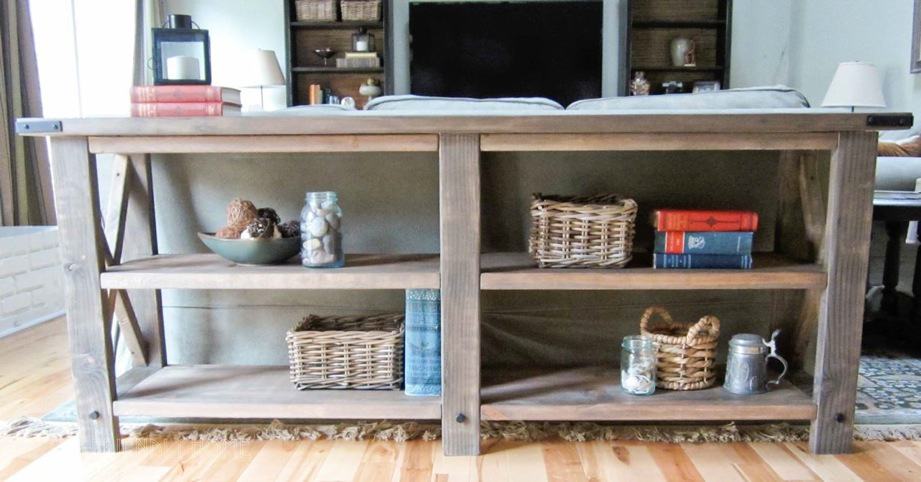
This piece of furniture is very functional. It can be used as TV stand and accent table. In addition, it offers you with large storage space.
Therefore, your family room will look less cluttered. Materials you need to make the farmhouse TV stand are:
- 8 feet long of 2”x2”: 6
- 12 feet long of 1”x12”: 1
- 8 feet long of 2”x4”: 3
- 8 feet long of 2”x6”: 3
- 2 ½ screws
- 1 ¼“ pocket hole screws
- 2 ½” pocket hole screws
Once you have the materials, you can start working on this farmhouse TV stand.
- Cut the wooden materials into:
- 30” long of 2x2s: 12
- 28 ½” long of 2×4: 6
- 63 ½” long of 1×12: 2
- 11 ¼” long of 2×4: 5
- 11 ¼” long of 2×2: 2
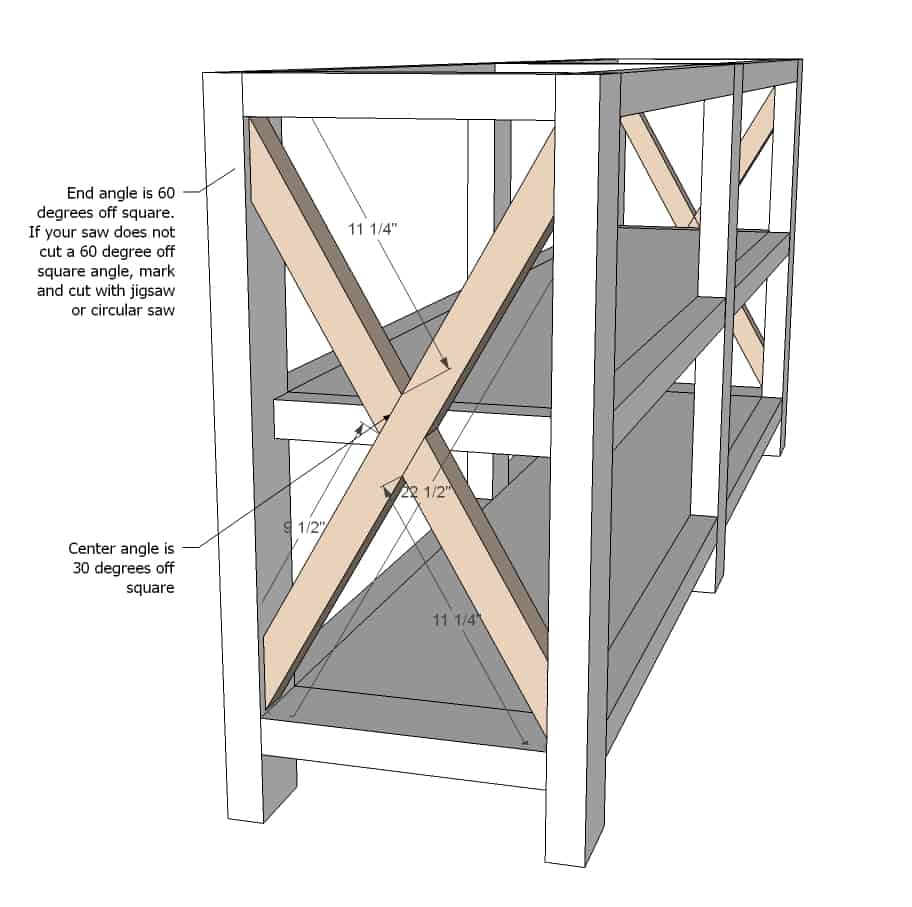
- 22 ½” long of 2×2: 2 (the long point to make the X, cut at 60o
- 11 ¼” long of 2×2: 4 (the short point to make the X, cut at 60o at one end and 30o at the other end)
- 74 ½” long of 2×6: 3
- Built the long frame of the table using 3 of the 28 ½” long cuts as the legs and 6 of the 30” long cuts. Use the remaining of 30” and 28 ½” long cuts to make the other leg frame.
- Attach two 63 ½” long cuts to the frames so that you will have the shelves.
- Use the 11 ¼” long 2×4 cuts to connect the frames. Attach each of them on the bottom left and right sides, the upper left and right sides, and the mid-upper side.
- Attach the 11 ¼” long of 2×2 cuts at the sides of the middle shelf.
- Make the Xs on the side of the table.
- Screw all the 74 ½” long cuts on the upper side of the table so that they form the tabletop.
- Finish the TV stand using stain and paint.
Crate DIY TV Stand
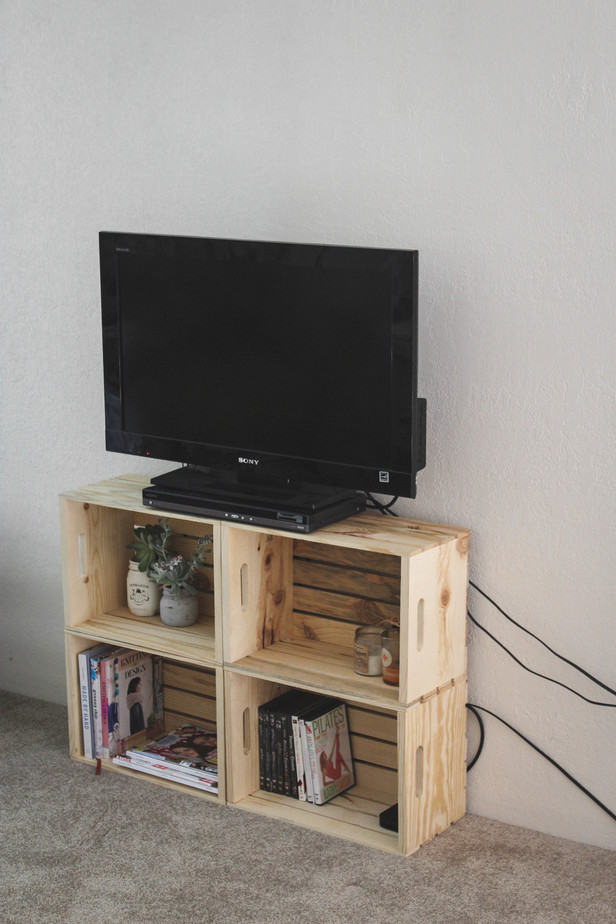
This TV stand idea is perfect for you who don’t have much time to make a more complicated TV stand. In addition, it is also perfect for you who are a beginner in DIY.
The best thing about this DIY project is that it is very affordable. To make this furniture, you need crates, drill, and screws. You can also get some finish to make the crate TV stand more interesting.
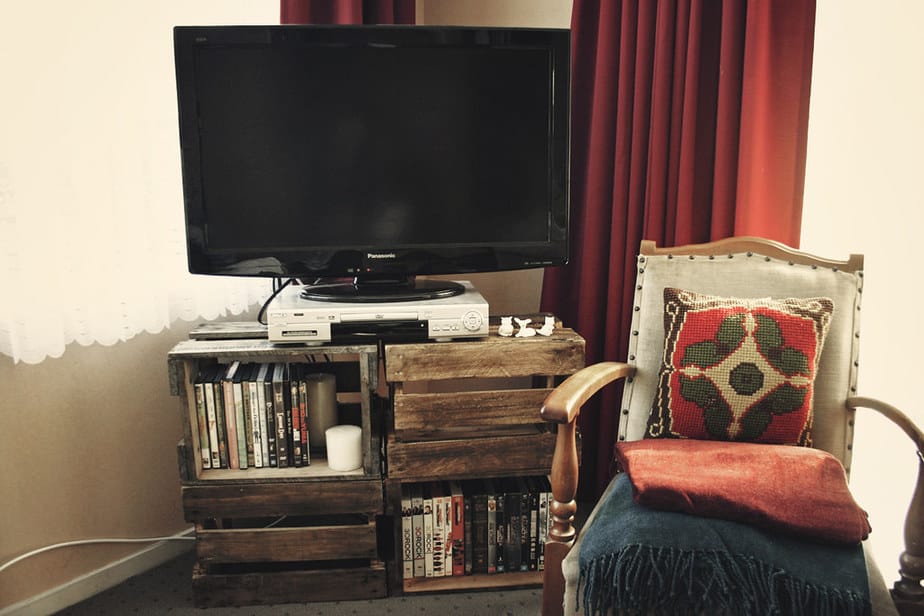
To make it, you can follow these steps.
- Decide the arrangement of crates you want. If you want a sturdy TV stand with more storage options, you can arrange the 2 crates at the bottom and 2 upper crates.
- Screw the crates into other crates. Make sure that you have enough screw so that this piece of furniture is sturdy.
- Sand and apply your desired finish on the crate TV stand.
- Now, you have a simple and unique TV console.
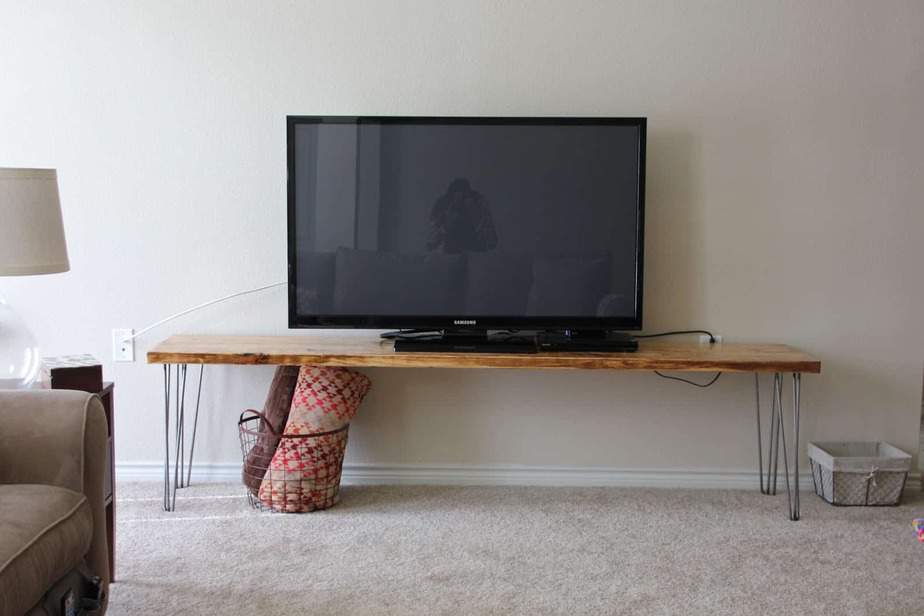
Pallet DIY TV Stand with Hairpin Legs

The wood pallet is probably the most favorite DIY material. It is very affordable and sturdy enough. In addition, it can be made into various furniture.
One of them is TV stand. This pallet TV stand with hairpin legs do not require advanced DIY skill.
Therefore, everyone can make it without any difficulties. You will need two wood pallets, hairpin legs, and screws for this project.
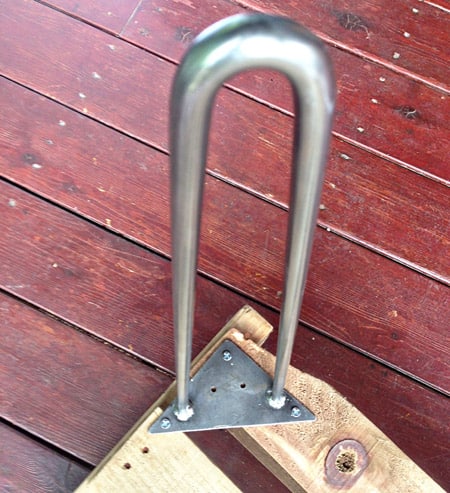
These are what you must do to make it.
- Clean the pallets from any rusty nails.
- Sand the pallets so that it is smooth
- Apply the finish you want.
- Create pocket holes on each of the corner of one pallet.
- Screw the hairpin legs into the pallet.
- Attach the other pallet to the one with hairpin legs. Therefore, you will have TV stand with large storage.
DIY TV Stand from an Old Dresser
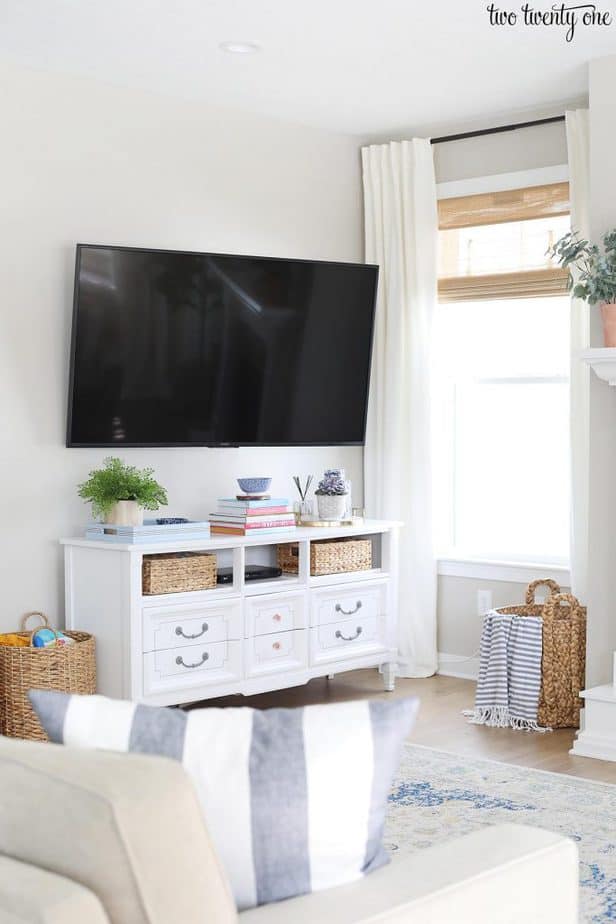
If you have an old dresser, you can turn it into a TV stand. This DIY project is pretty affordable because you don’t need to buy the main materials.
You only need to get some finishing products and 5/8” thick board to make the shelves. In addition, this TV stand idea has an attractive look that will make your family room looks more stylish.
In order to make this project, you can follow these steps.
- Remove all the drawers. You also need to remove the drawer tracks, slides, and stops at the upper drawers.
- Sand the dresser and the middle and bottom drawers.
- Apply primer and white paint on them.
- Cut 5/8” thick board based on the measurement of the upper dresser. Sand the board and apply the similar finish to the dresser and drawers.
- Place these cuts on the upper part of the dresser so that you have a shelf.
- Create three cable holes, about 1.5” in diameter, at the back of the shelf.
- Put the midle and bottom drawers back into the dresser and you will have a new TV stand from your old dresser.
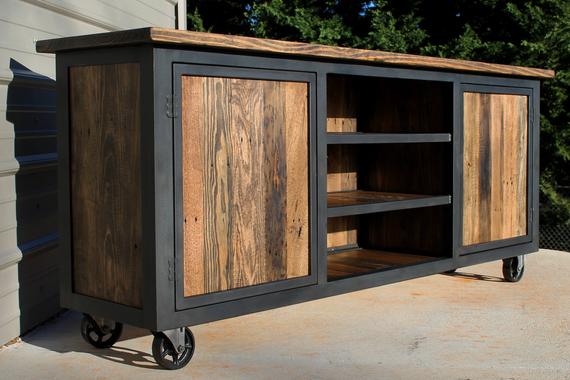
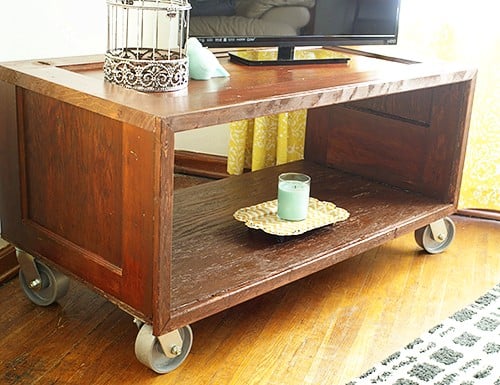
Industrial DIY TV Stand with Wheels

A TV stand is heavy to move about. If you love to rearrange your family room, you need to consider this industrial TV stand with wheels. This piece of furniture is not that difficult to make.
It is perfect for beginners. In addition, the minimalist style of this TV stand is great for a modern interior. The materials you need to make it are:
- 4 ft long 10”x2” boards: 4
- Swivel castors: 4
- 1 ½” galvanized flanges: 8
- #12×1” hex head screws:32
- 1 ½” galvanized threaded pipes: 4
- #14×1” hex head screws: 16
- Finish
Steps of making an industrial TV stand with wheels.
- Create a shelf by assembling two 10”x12” boards to make the console top. Use the remaining 10”x12” boards to make the other shelf.
- Sand the boards and apply the finish.
- Screw 4 flanges into the top shelf’s underside. You need #12×1” hex head screws for it.
- Screw the threaded pipes into the flanges.
- Attach the remaining flanges on the other board.
- Insert the other end of the pipes in the flanges.
- Flip the shelf so that the top shelf is at the bottom.
- Install the swivel castors on the underside of the bottom shelf. Use #14×1” hex head screws for this installation process.
- Flip back the desk and you will have an industrial TV stand with wheels.
Tall Corner DIY TV Stand
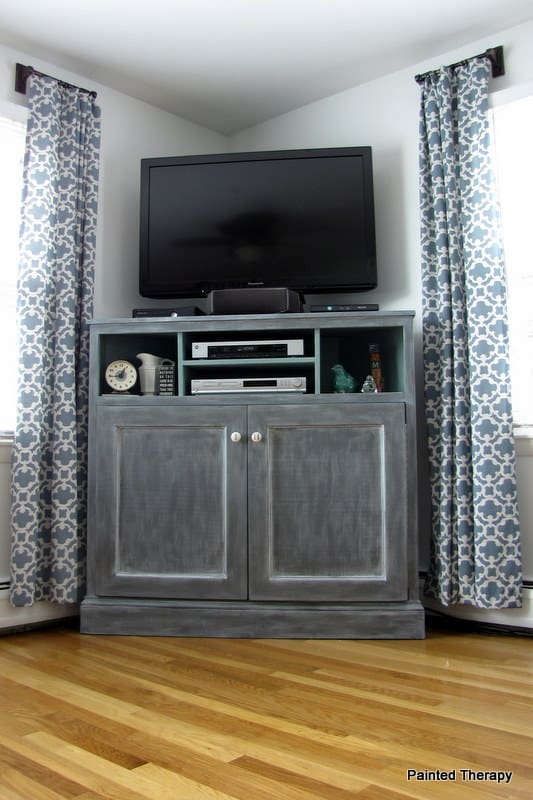
Having a corner TV stand will optimize the use of the space. This tall corner TV stand will surely make your family room looks more spacious and organized.
In addition, it is perfect for you who have small children. If you have this TV console, your kids will not be able to access the electronic equipment.
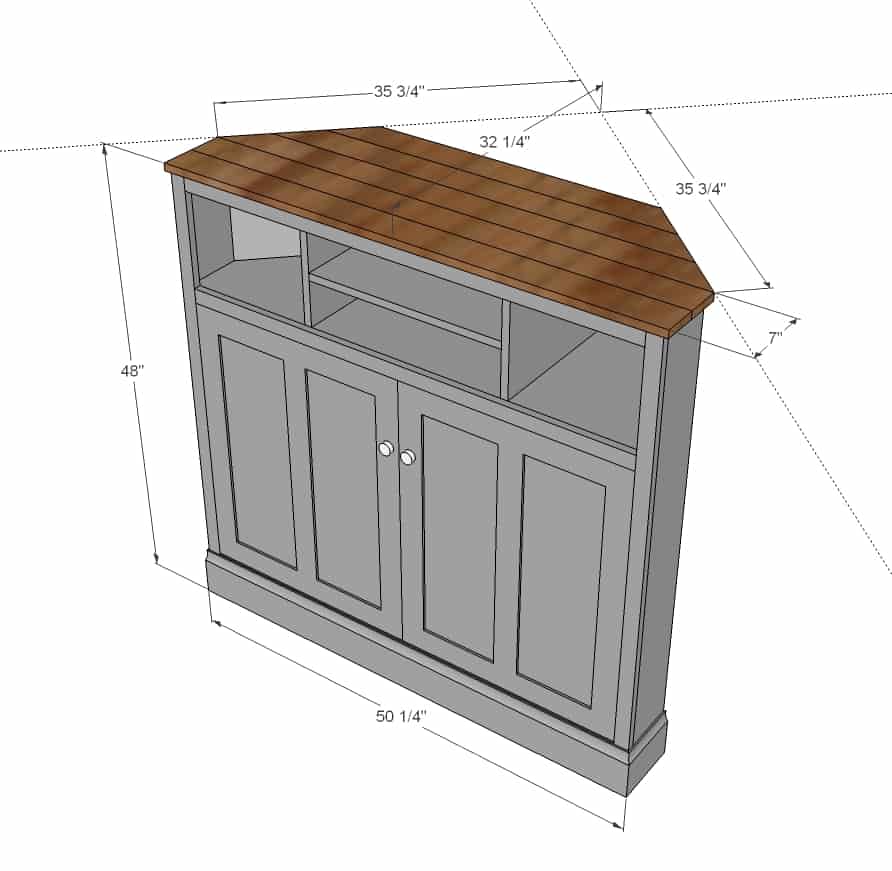
You will need these materials to make this furniture.
- A sheet of ¾” thick plywood cut into 15 ¾” x 8’ (referred as 1×16 boards)
- ¼” thick plywood (for door backs and back)
- 8 ft long of 1×6: 1
- 8 ft long of 1×2: 5
- 8 ft long of 1×4: 2
- 6 ft long of 1×4: 1
- 5 ¼” base molding or 6 ft stick
- 1x3s
- 1 ¼” pocket hole screws and
- 2” and 1 ¼” finish nails
- Finishing materials
Then, you can start making this corner TV stand
- Cut the woods into:
- 20” long of 1×16: 1 (as the center shelf)
- 10 ½” long of 1×16: 2 (as the dividers)
- 48” long of 1×16: 4 (for the bottom, cut as shown on the image below)
- 47 ¼” long of 1×6: 2 (as the sides)
- 47 ¼” long of 1×2: 4 (as back supports)
- ¼” thick plywood cut into 24 ½” x 47 ¼”: 1 (for the back middle)
- ¼” thick plywood cut into 13” x 47 ¼”: 2 (for the back middle)
- 47 ¼” long of 1×2: 2 (for the side face frame)
- 46 ½” long of 1×2: 3 (for the shelf face frame trim)
- 50 ½” long of 1×4: 2 (for the top)
- 50 ½” long of 1×4: 1 (for the top, each end was cut in 45o off square)
- 36 ½” long of 1×4: 1 (for the top, each end was cut in 45o off square)
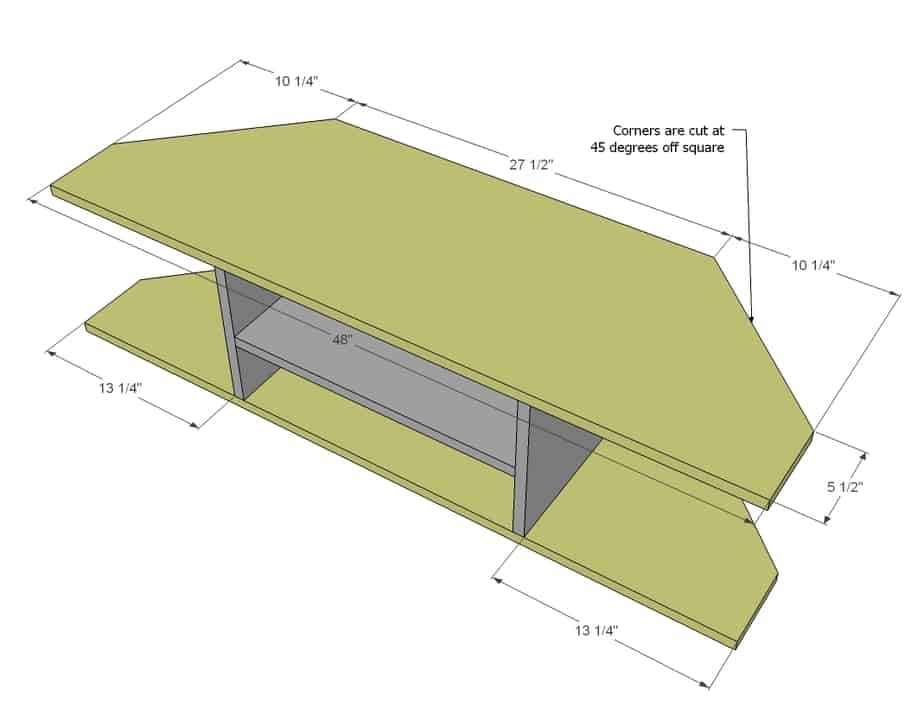
- Create the top shelves using the center shelf and dividers. The center shelf must be screwed at 5” from the top of the dividers and 4 ¾” from the bottom of the dividers.
- Create the top and the bottom of the console. The corners must be cut at 45o angle as shown in the image above.
- Attach the top and bottom to the top shelves.
- Screw the 47 ¼” cuts on each side of the top shelf.
- Add middle and lower shelves. The latter must be at 4 ¾” from the floor.
- Attach the back supports.
- Nail the back middles.
- Install the face frames.
- Attach the base molding at the bottom.
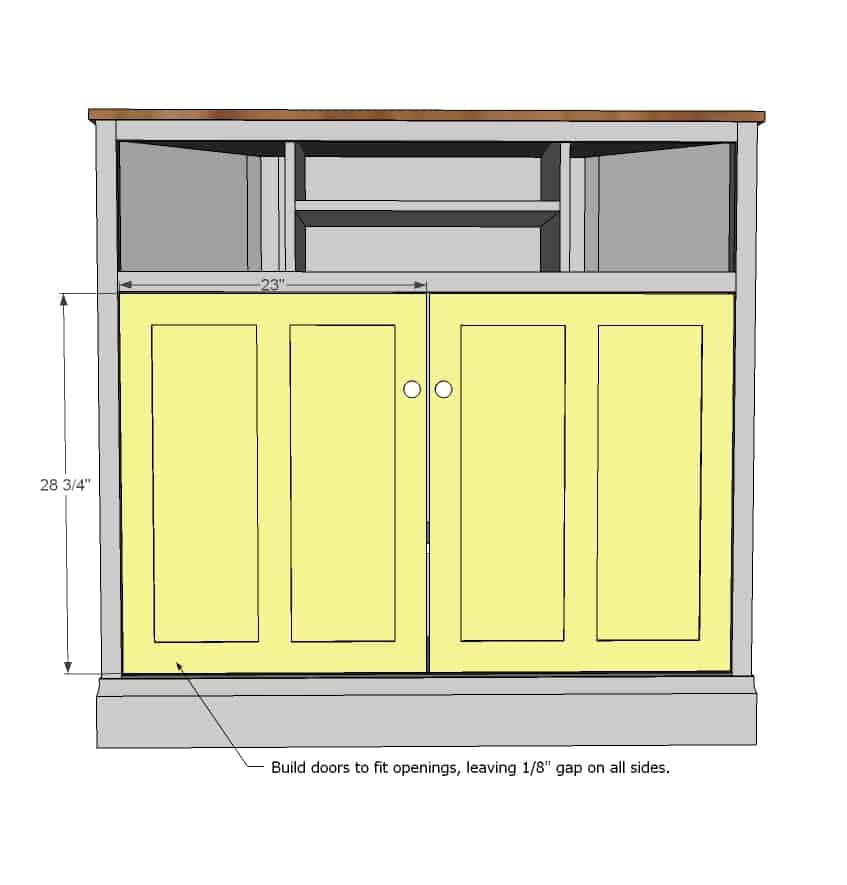
- Create the doors and attach it to the lower shelves.
- Paint or stain the wood to make the console more attractive.
DIY TV Stand from an Old Door
For you who have an old unused door, you can transform it into a TV stand. This DIY project is quite simple. In addition, the result of this transformation is great.
It is minimalist and offers you with storage space. You don’t need a number of material for it. The materials are an old door, casters, and an additional board and plywood.

These are the steps of transforming your old door into a TV stand
- Cut the door into 3 parts. These parts are one for the top and two for the sides. You need to make sure that the sides are in equal height. Therefore, you will have a level DIY TV stand.
- Cut the board in the same measurement of the console top.
- Cut the plywood to create the face frame trim.
- Sand all the parts and apply the finish.
- After the finish is dry, screw the sides into the console top so that it looks like a table.
- Next, attach the board at the lower legs and instal the face frame trim.
- Screw the casters into the bottom part of the console.
Concrete DIY TV Stand
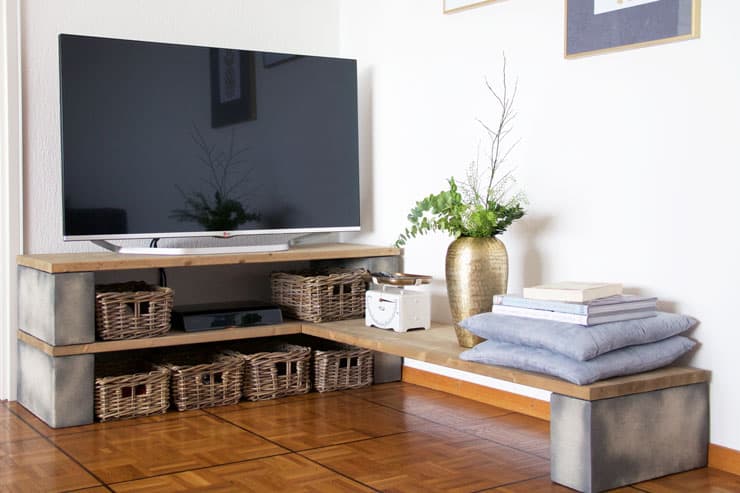
For you who are not good in woodworking, you can choose this DIY project to make your new TV Stand. This is a very unusual idea.
However, it is unique, sturdy, and functional. Therefore, your interior will look amazing if you have this unusual TV stand.
The materials needed for this project are:
- Concrete foundation blocks 12cmx40cmx20cm: 6
- 3 cm thick pine wood 121 cm x 40 cm: 1
- Wood stain
- 3 cm thick pine wood 160 cm x 40 cm: 1
- Metal mending plates
- 3 cm thick pine wood 81 cm x 40 cm: 1
- Screws
- Cement
Next, you can follow these steps.
- Sand the pine wood planks until they have smooth surface and smooth edges.
- Apply the wood stain on these wood planks and dry them.
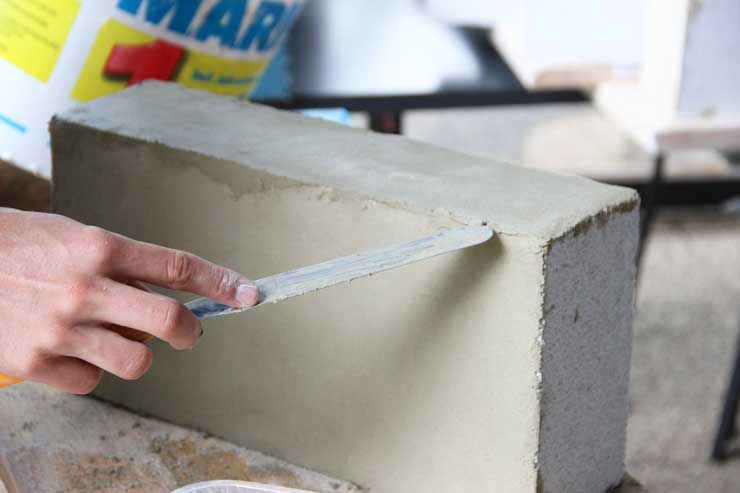
- Create a cement mix based on the package.
- You must coat the concrete foundation blocks using the cement mix. These blocks crumble easily. Therefore, you need to coat the blocks as a protection against crumbling.
- Once the cement coating is dry, you must arrange these block in your family room. Arrange the block so that you have a small L-shape concrete leg at the corner and a large L-shape legs.
- Attach two wood planks above the concrete blocks. Therefore, you have an L-shape shelf.
- Place 2 concrete blocks on top of one wood plank.
- Attach a wood plank above these concrete blocks so that you have a console top.
- Now, you have a unique TV stand.
- In order to make your family room looks more organized, you can place some baskets on the shelves.
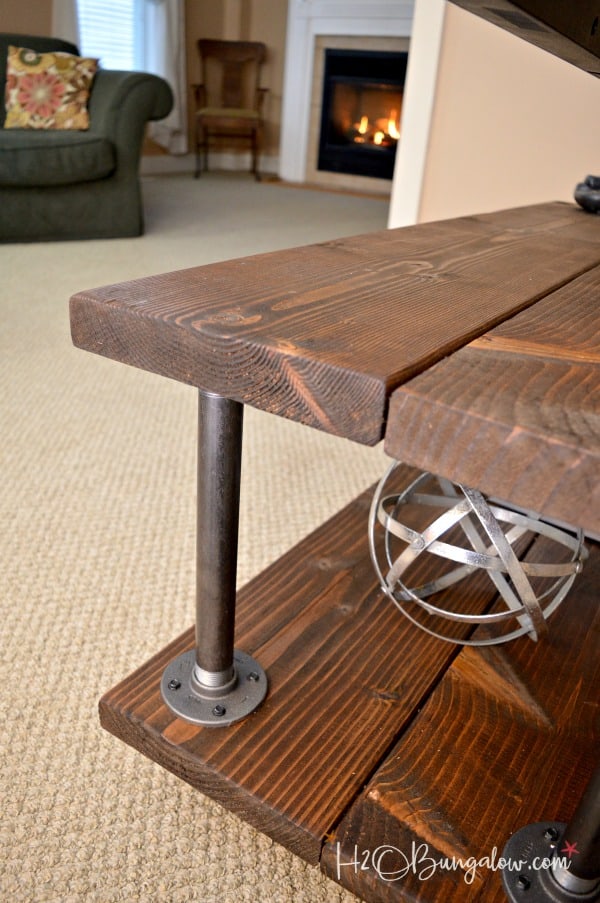
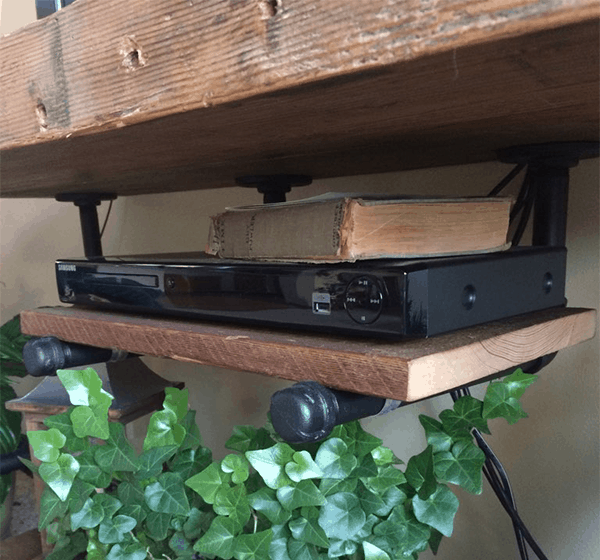
Reclaimed Wood DIY TV Stand with Pipes
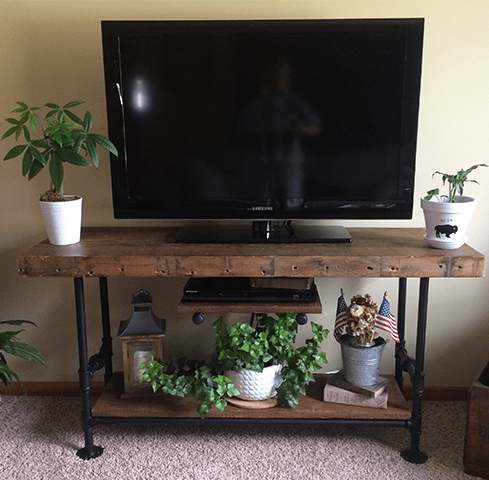
This DIY TV Stand project requires less woodwork. Therefore, it is easier to make and not time consuming. This desk is made of reclaimed wood and metal pipe. Therefore, it looks a bit unusual and rustic.
These are the materials you need.
- A thick and sturdy reclaimed wood
- ¾” pipe threaded tees: 8
- ¾” threaded floor flanges: 8
- ¾” threaded unions: 2
- ¾”x4” nipples: 12
- 14” long of ¾” pipe: 4
- 41 ½” long of ¾” pipe: 2
For the middle shelf
- ¾” threaded elbow: 2
- ¾” threaded caps:2
- ¾” threaded floor flanges: 2
- ¾” x 11 nipples: 2
- ¾” x 5 nipples: 2
Steps to make a reclaimed TV stand with pipes.
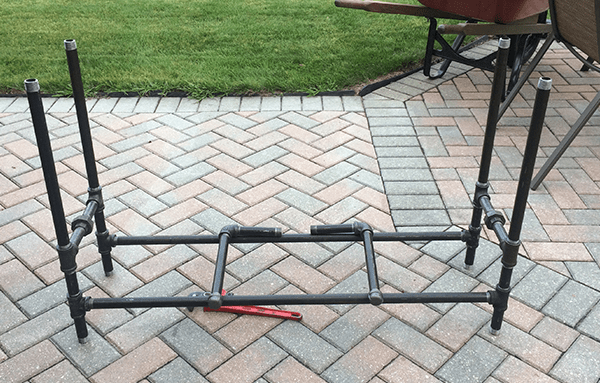
- Get your metal pipes cut and threaded by profesional if you don’t have the equipment to do it. This service is usually available in the stores that sell metal pipes.
- Clean the pipes and joints. After that, paint it in black or another color.
- When the paint is dry, assemble the pipes and joints so that it looks like the image above.
- Cut the reclaimed wood based on the measurement of the pipe base.
- Attach the flanges on the underside of the console top.
- Insert the pipe into the flanges attached to the board.
- Insert the other end of the pipe into the floor flanges.
- Screw 4 flanges in the middle of the underside of the top. After that, insert the middle frame pipes into the flanges.
- Place the lower shelf to the lower piping frame and you have a new TV stand.
Floating DIY TV Stand
If you have a small family room, this floating TV stand will fit the room excellently. A floating console will make the room looks less cluttered.
In addition, this DIY project is not difficult to perform due to its simple design. All you need to make this console is thick wood panels and screws. If you already have the materials, you can start this project right away.
- Cut the wood panels into several parts, such as supports, the top shelf, and the bottom shelf.
- Sand the cuts and paint them in the right color.
- Attach the back support, side supports, and mid support to the wall.
- Screw the console top into the mounted supports.
- Attach the lower shelf to the mounted supports. Now, you have a new TV stand.
Create DIY TV Stand with Hairpin Legs

Simply arranging some crates to make a TV stand may be too simple for you. If you are looking for more challenges, you can create this crate TV stand with hairpin legs.
This piece of furniture looks unusual and functional. In order to make it, you need 2 crates, hairpin legs, screws, and paint.
- Sand the crates and paint them in a matching color to your interior.
- Use some screws to attach the crates to each other.
- Screw the hairpin legs into the bottom part of the joined crates.
- Now you have a unique TV Stand
Have you decided on which DIY TV stand ideas you want to make in your spare time? Choosing the right TV stand is very essential to make your family room looks great.
Therefore, you need to pick the project with consideration. One of the things to consider is your budget. Therefore, you don’t need to spend more money on it.
In addition, you need to think about your interior style and size of your home.